Fixed Asset Management Lifecycle
Properly managing your company's fixed assets—such as computers, machinery, vehicles, and furniture—is crucial for accurate financial reporting and tax compliance. LeapCount provides a complete suite of tools to track the entire lifecycle of an asset, from its initial purchase to its final disposal, including automated depreciation calculations.
Complete Walkthrough: Purchasing, Managing, and Depreciating Fixed Assets
Step 1: Record the Asset Purchase
The first step in an asset's life is recording its acquisition. This is done through the Asset Purchase module, which links the acquisition cost directly to a supplier.
- Navigate to Asset Management > Asset Purchase from the main menu.
- Click the + Add New Asset Purchase button.
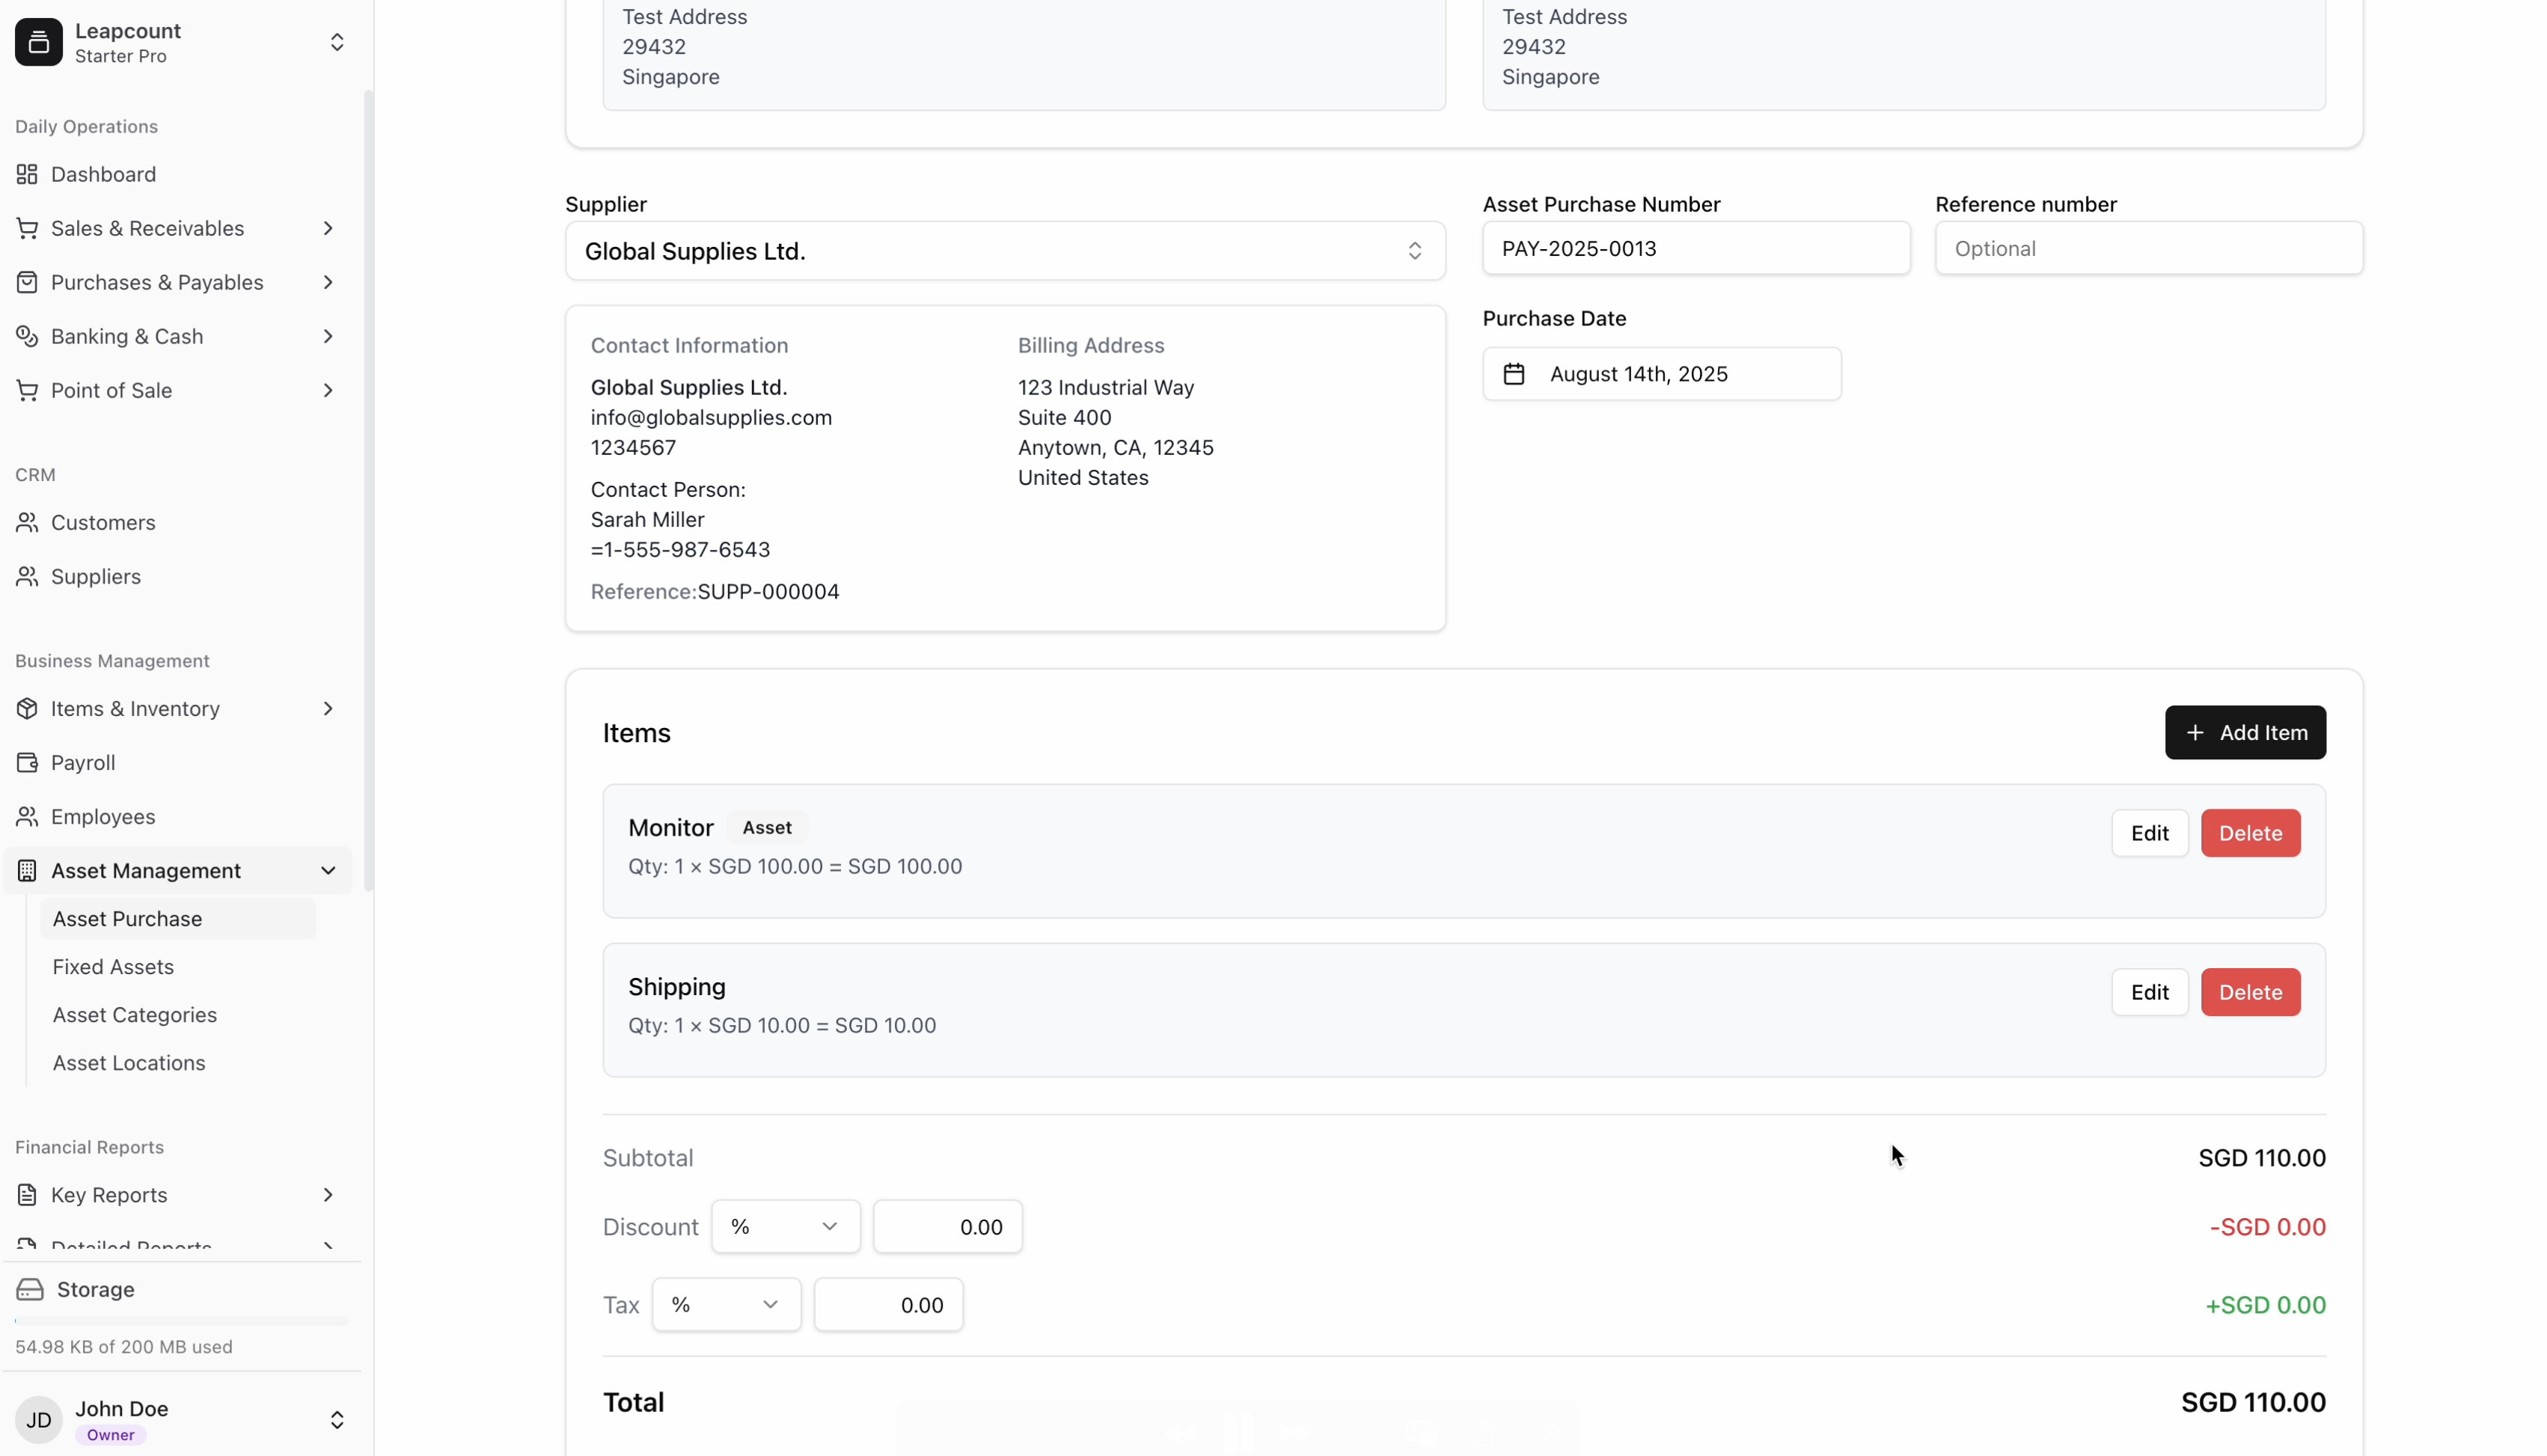
- Fill in the supplier details, purchase date, and any reference numbers.
- Click + Add Item to open the item entry form.
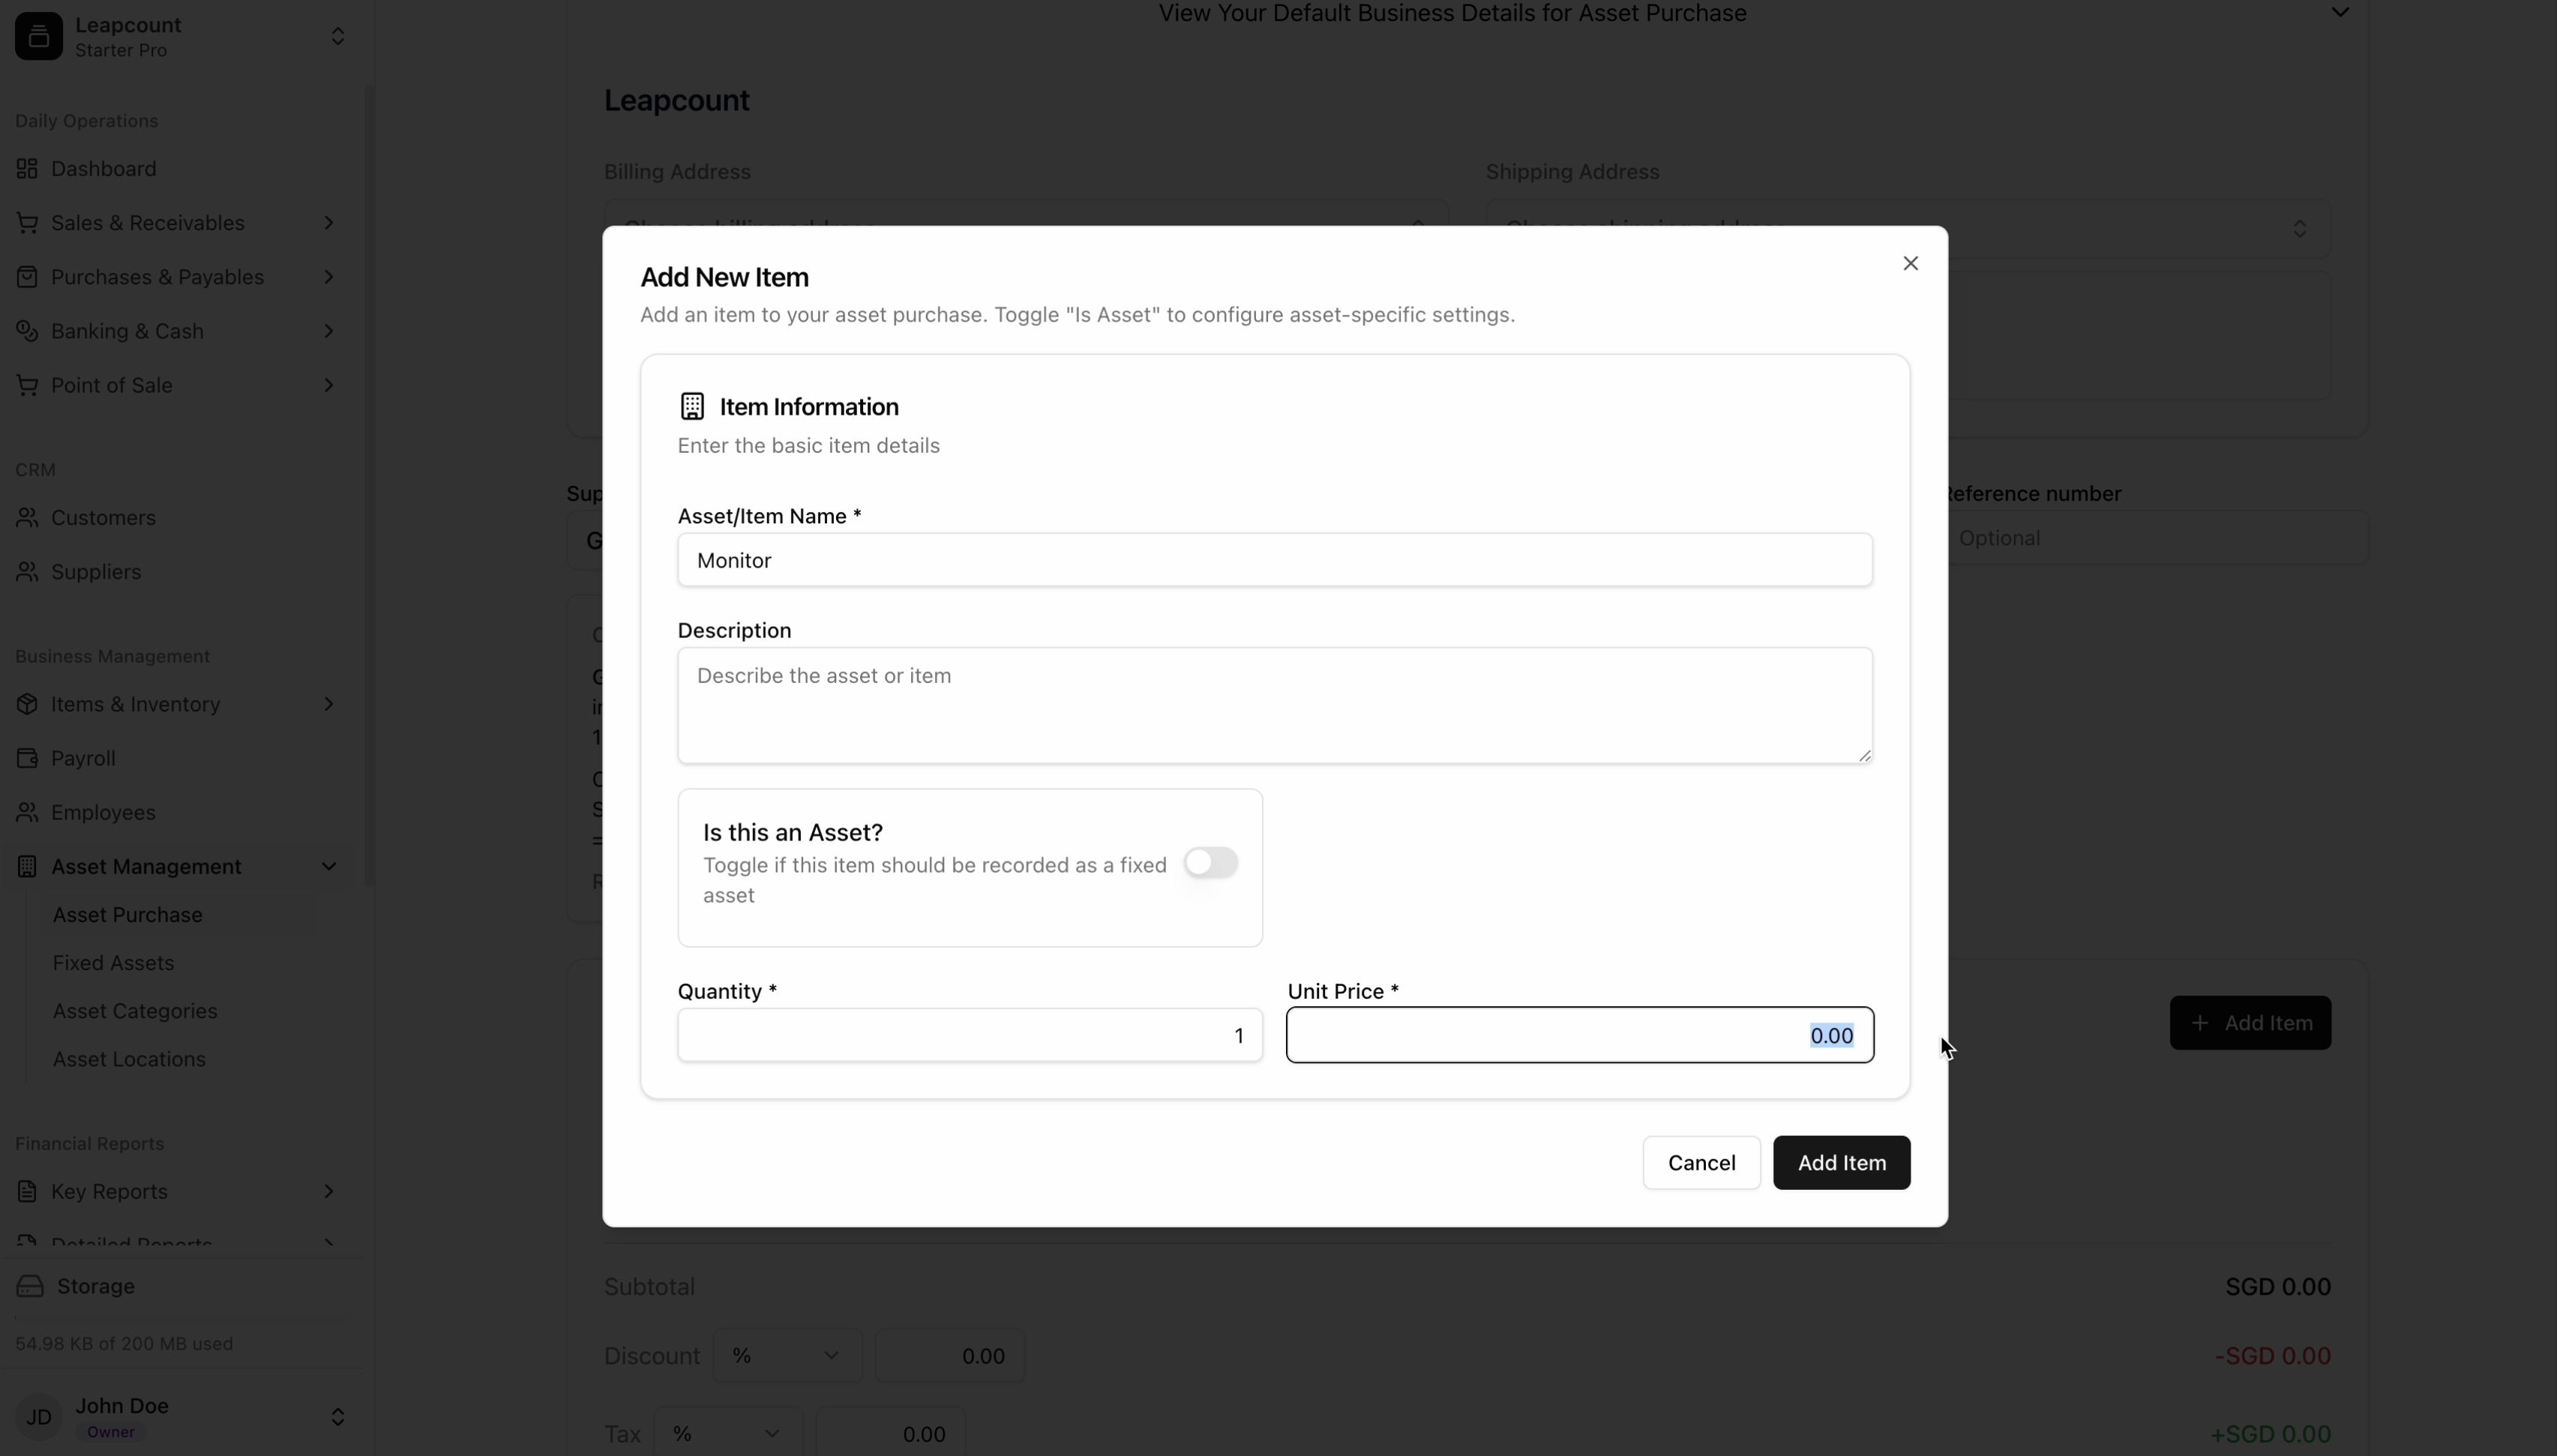
Inside the "Add New Item" modal, it is critical to identify the item as an asset.
- Enter the item name (e.g., "Monitor") and its unit price.
- Toggle the "Is this an Asset?" switch on. This tells the system to treat this item as a depreciable fixed asset rather than a regular expense or inventory item.
- Click Add Item and then Save the asset purchase.
Configure Depreciation on Entry: After toggling 'Is this an Asset?', additional fields for depreciation will appear. You must complete these settings (e.g., category asset, account asset, depreciation rate, etc.) at this stage to ensure the asset is configured correctly from the moment of purchase.
Step 2: Create the Fixed Asset from the Purchase
After recording the purchase, you must formally register it as a fixed asset in your company's records.
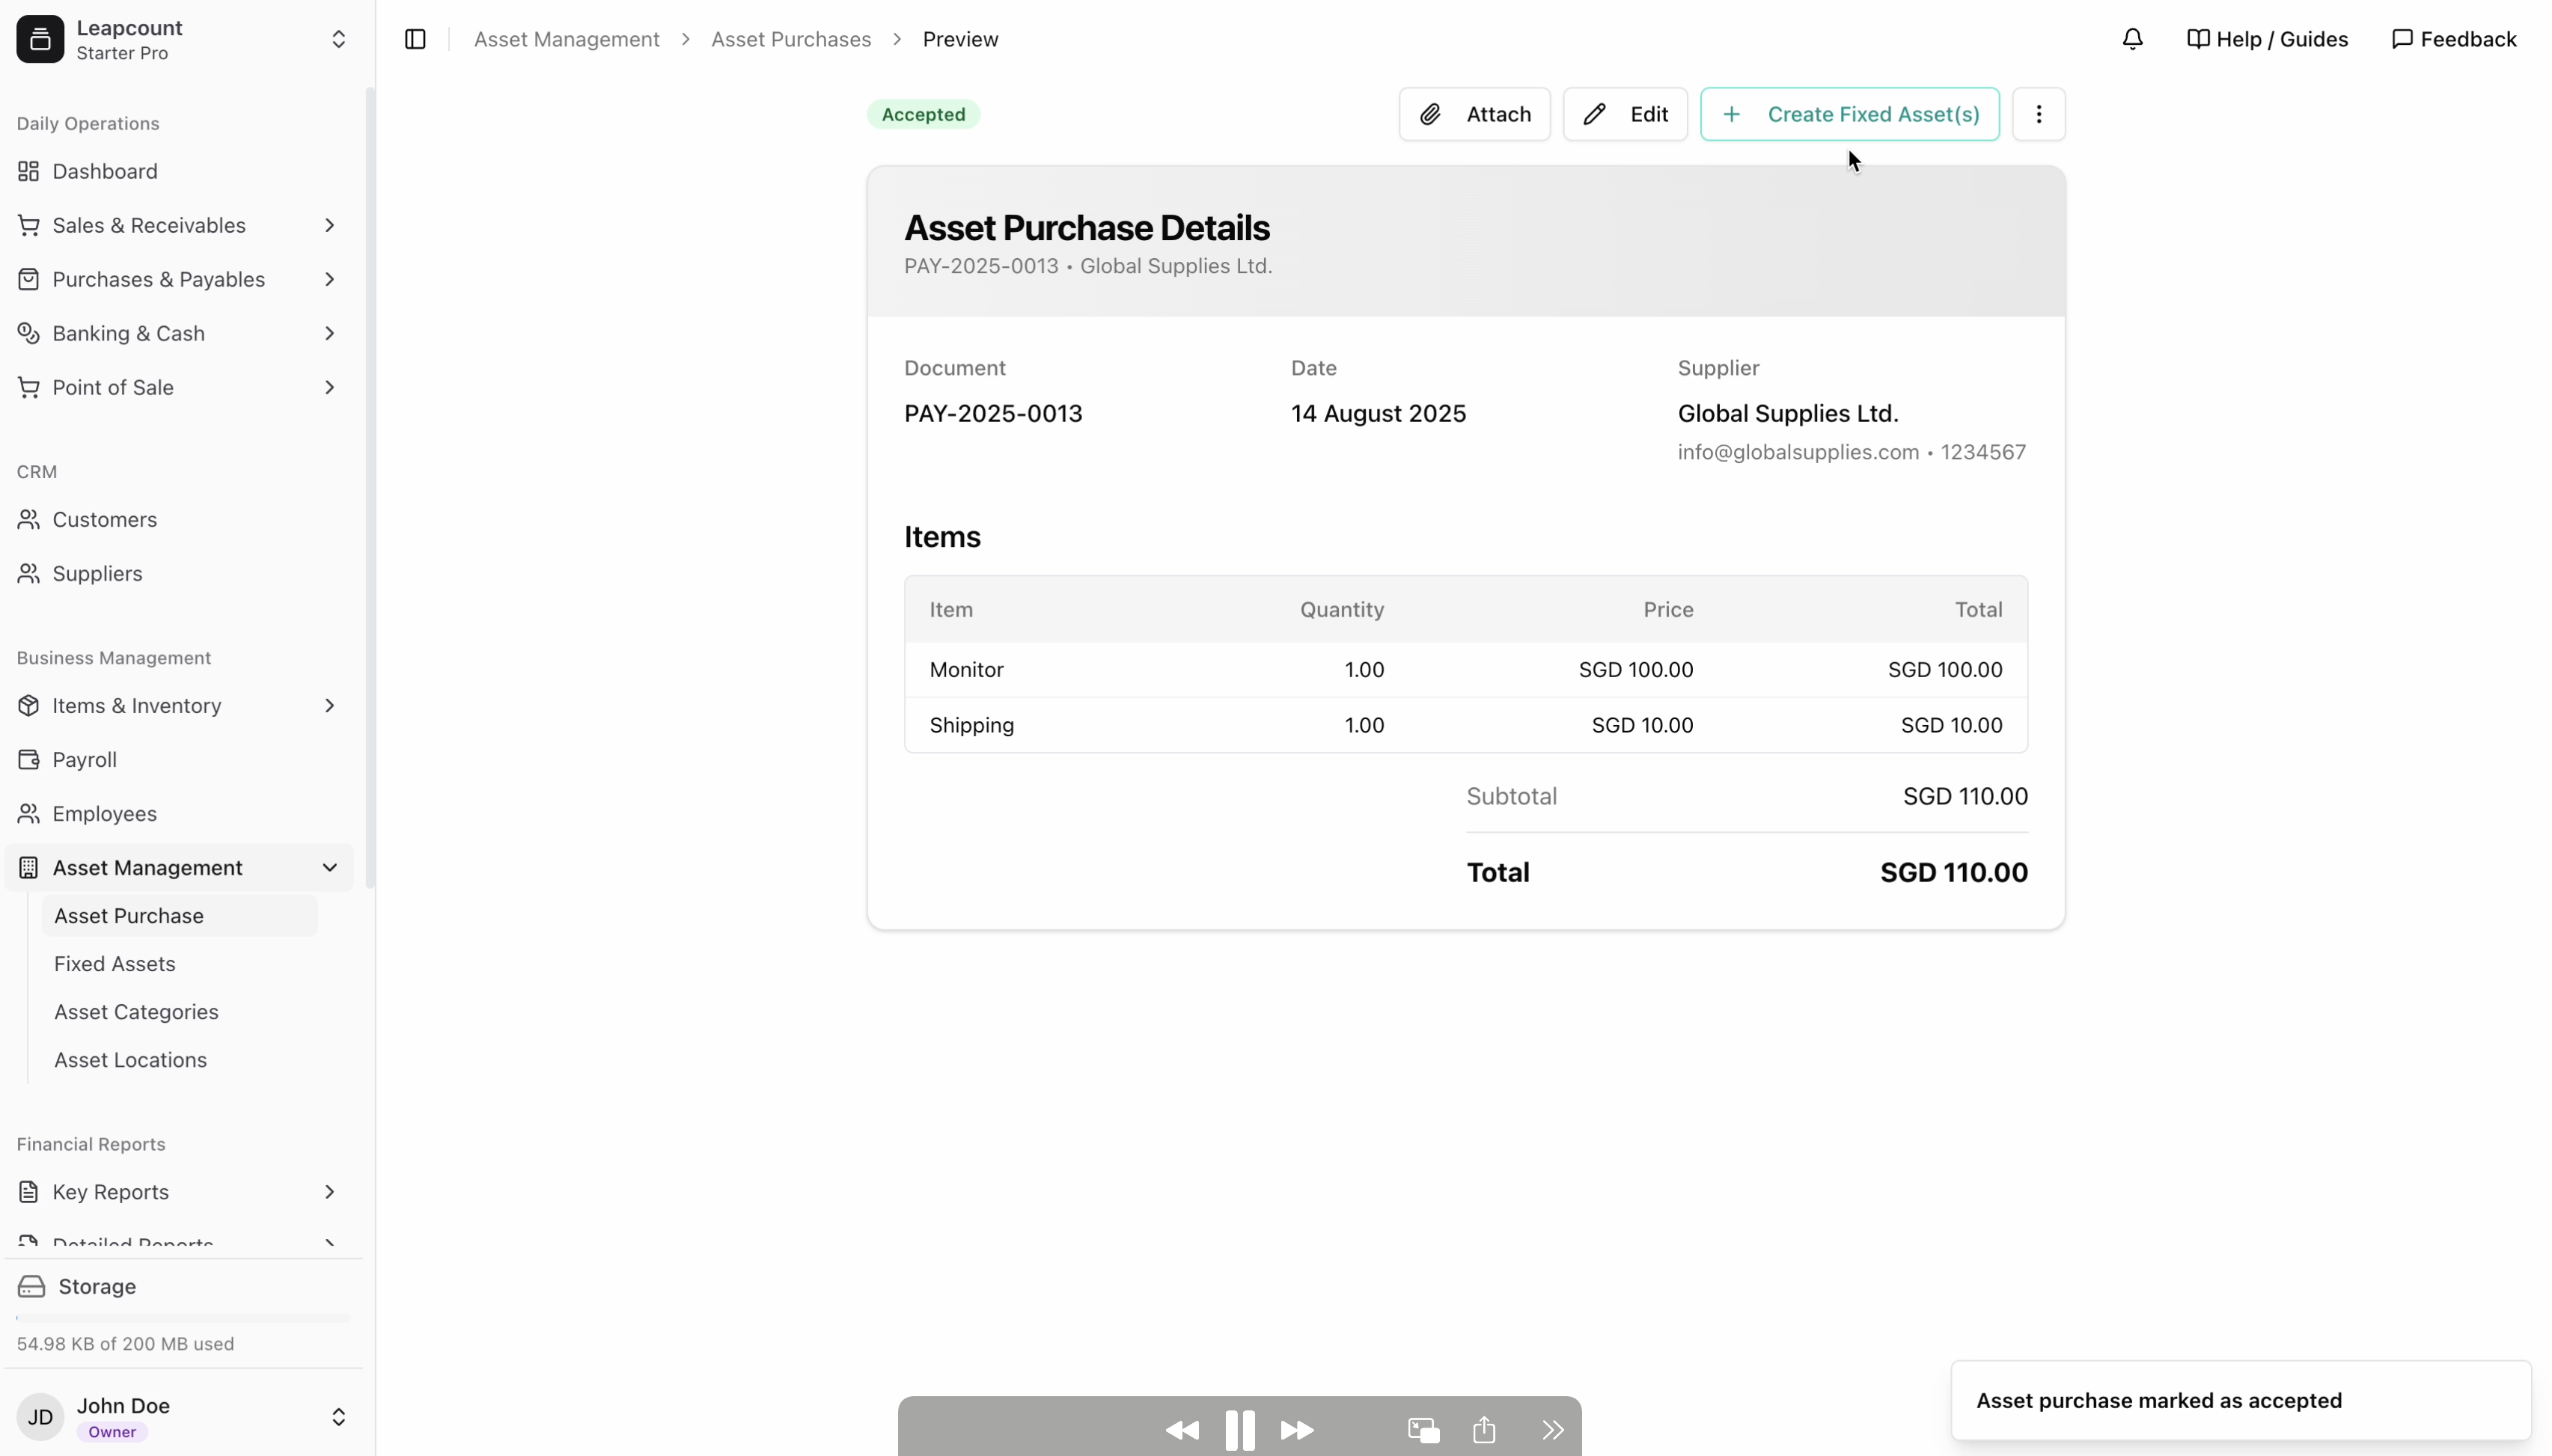
- From the Asset Purchase list, find the purchase you created. Its status will be "Accepted".
- Click on the purchase to view its details.
- On the details screen, click the + Create Fixed Asset(s) button. This action converts the purchased item into a registered asset record.
Step 3: View and Manage the Asset
Once created, the asset appears in your Fixed Assets register. This is the central location for managing all information related to the asset throughout its useful life.
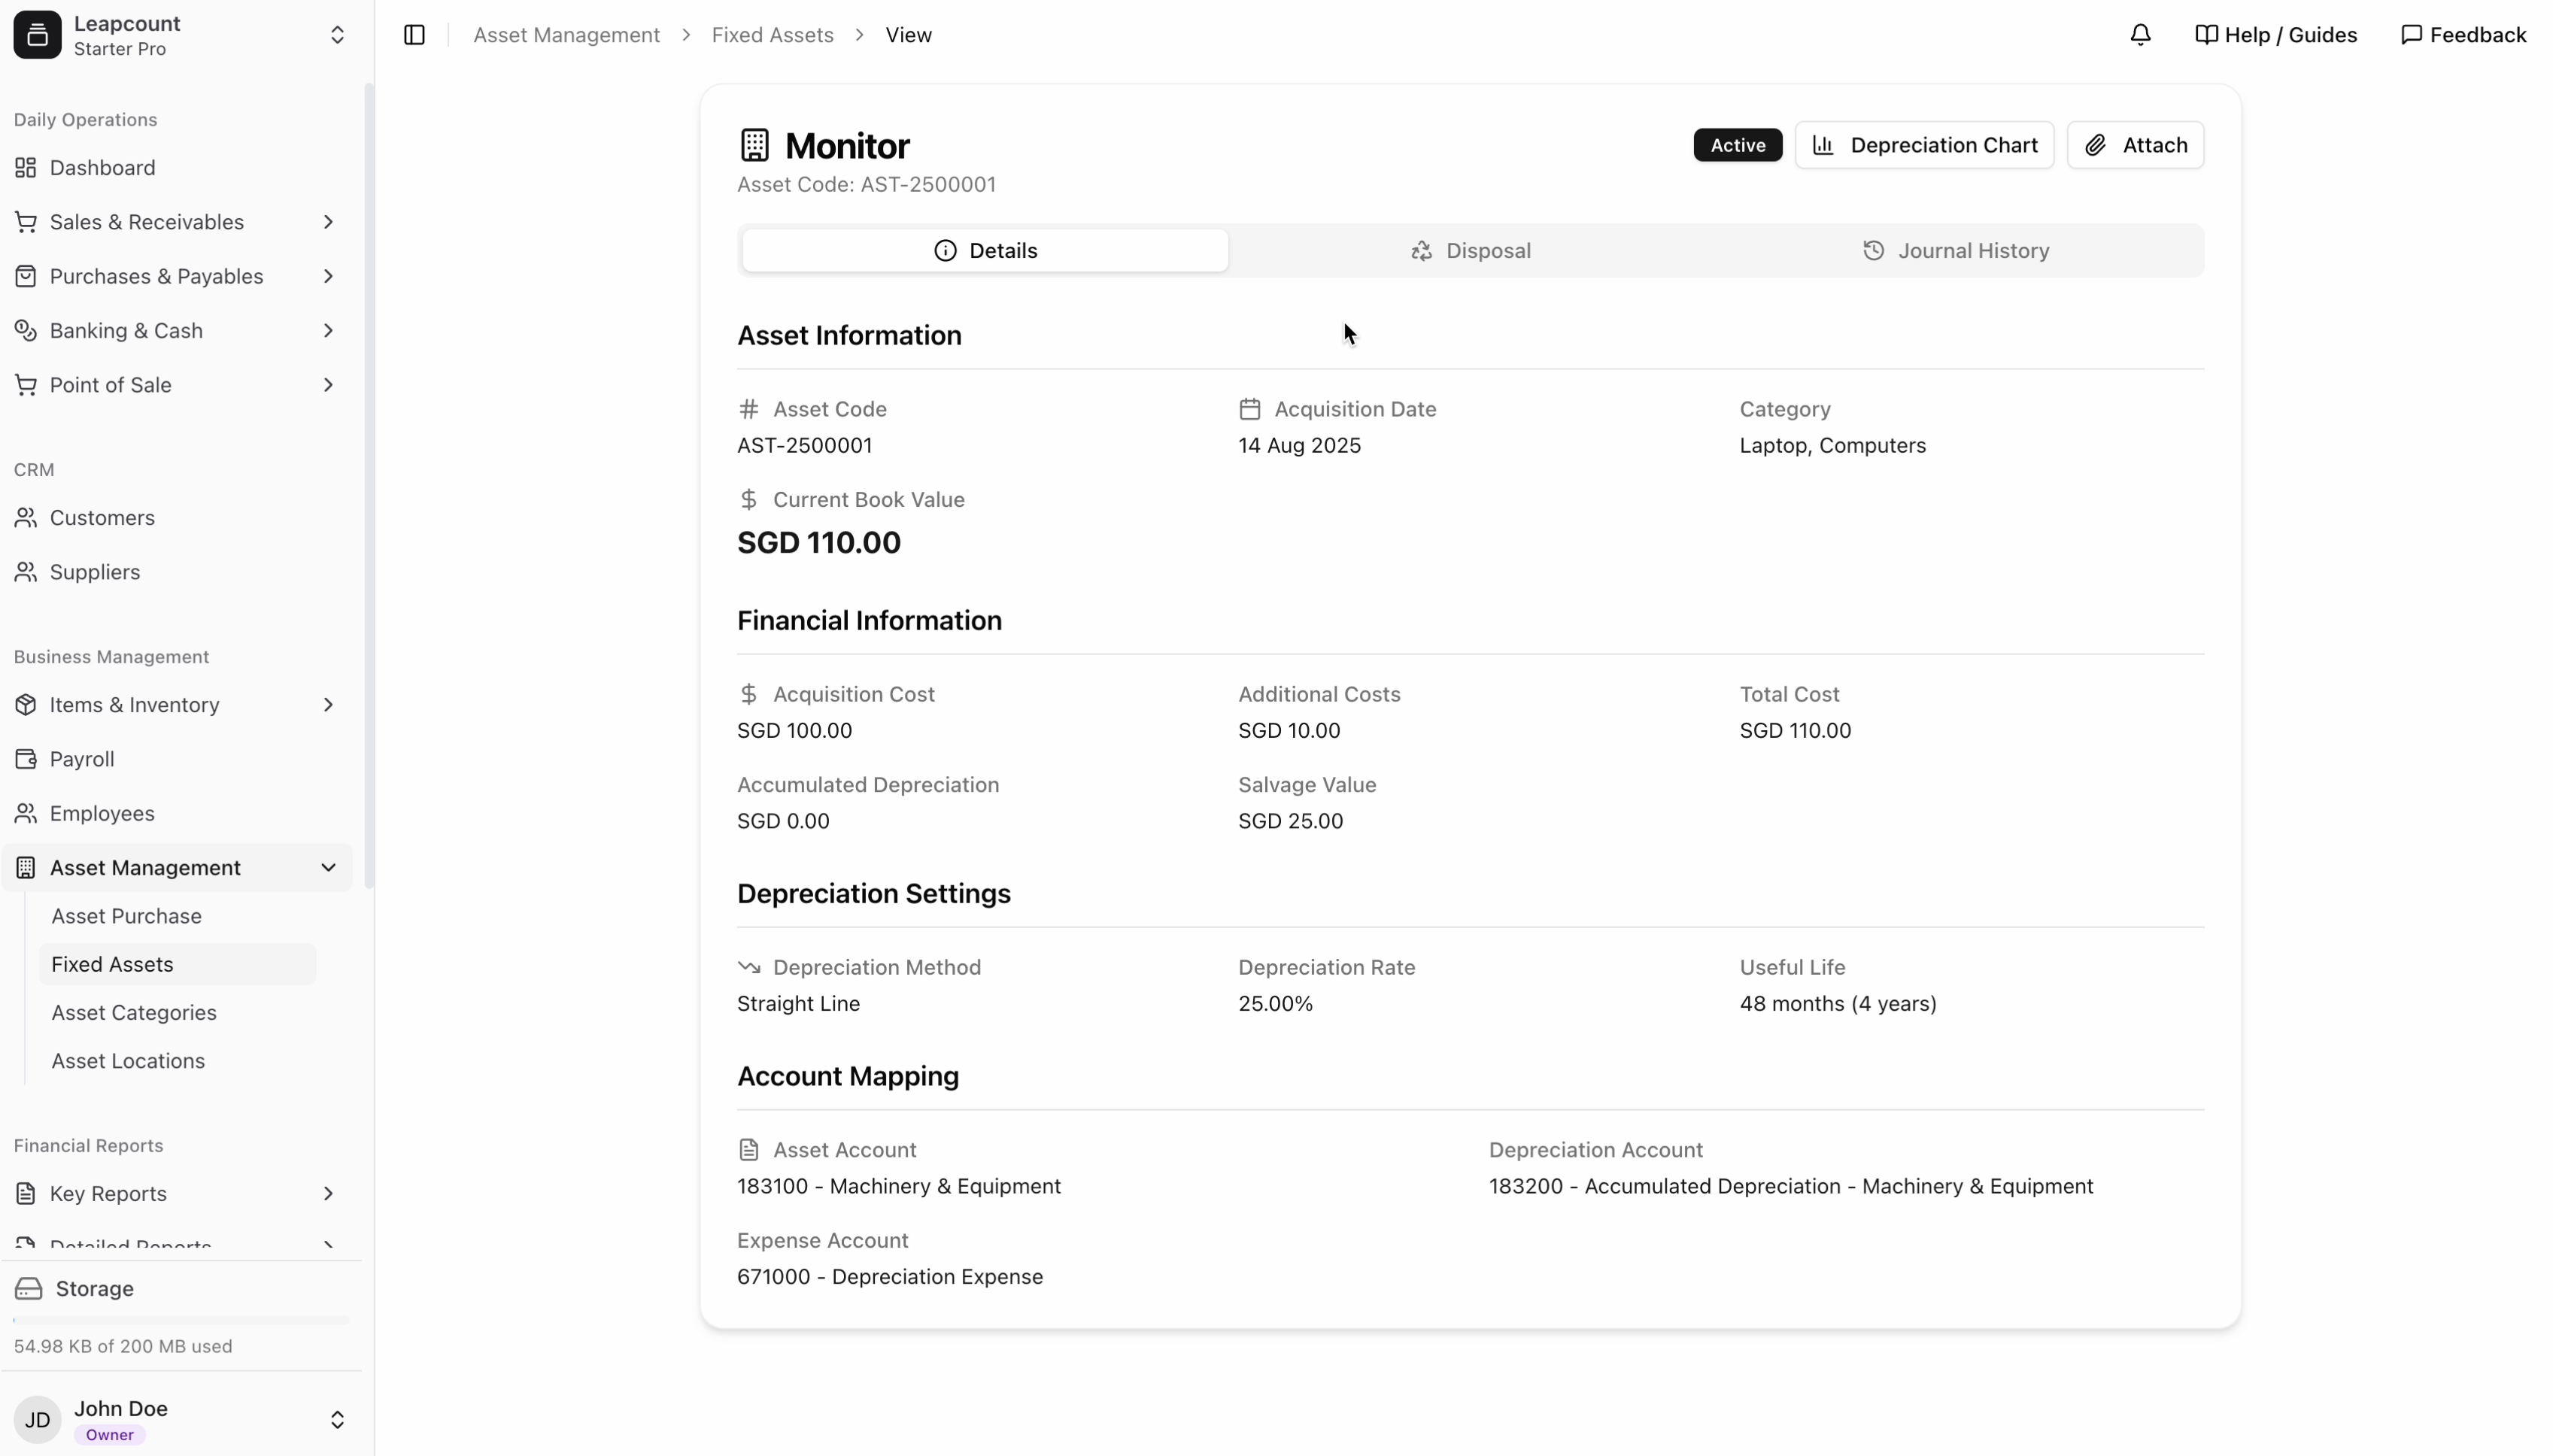
Navigate to Asset Management > Fixed Assets. Here you will find the asset you just created. Clicking on it reveals the details page, which includes:
- Asset Information: Asset Code, Acquisition Date, and Category.
- Financial Information: The total cost, any accumulated depreciation, and its current book value.
- Depreciation Settings: The method (e.g., Straight Line), rate, useful life, and salvage value.
- Account Mapping: The specific general ledger accounts for the asset, its accumulated depreciation, and the depreciation expense.
Step 4: Run Monthly Depreciation
Depreciation is calculated and posted automatically through a month-end process.
Depreciation Start Date Rule: Depreciation for a newly acquired asset will only be calculated in its acquisition month if the asset is owned for at least 15 days within that month.
- Example 1: An asset acquired on August 14, 2025, will have depreciation calculated for the month of August.
- Example 2: If the same asset were acquired on August 20, 2025, its first depreciation charge would be calculated at the end of September.
To run the process:
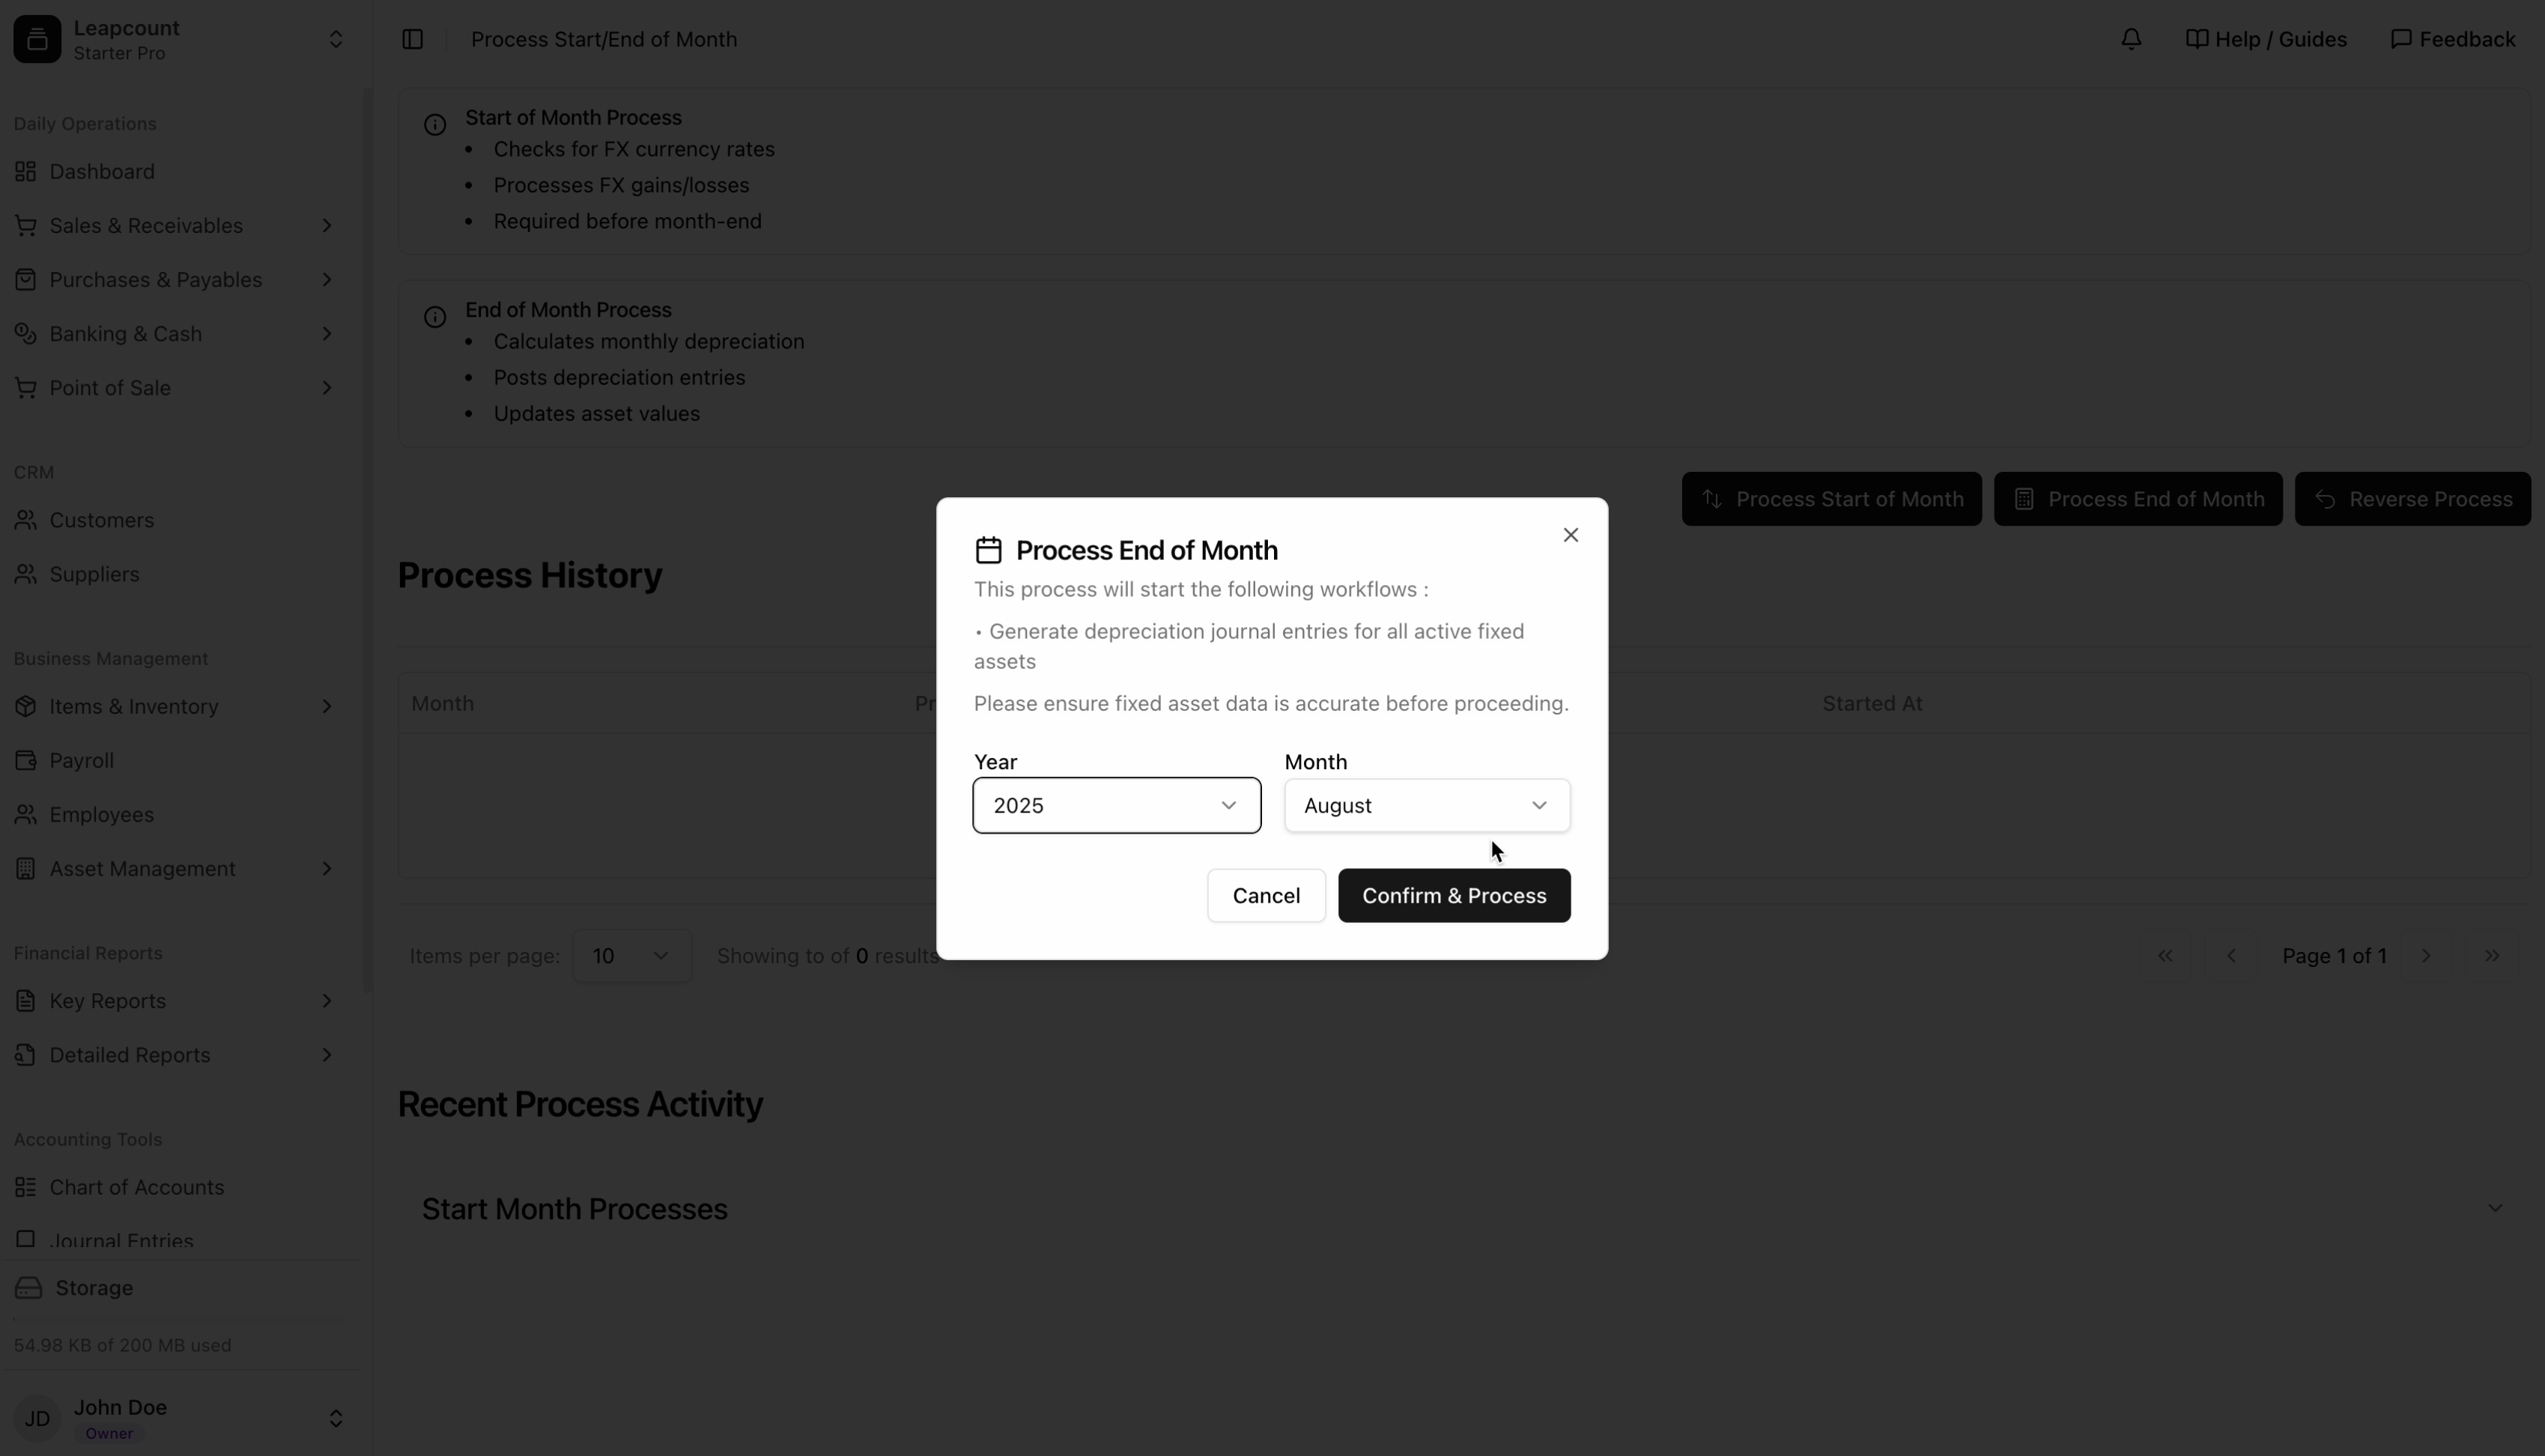
- Navigate to Business Management > Monthly Process.
- Click on the Process End of Month button.
- A confirmation window will appear. Select the Year and Month you wish to process.
- Click Confirm & Process.
The system will then automatically calculate the depreciation for that month for all eligible fixed assets and post the corresponding journal entries.
Step 5: Record Asset Disposal
When an asset is sold, scrapped, or retired, you must record its disposal to remove it from your books and calculate any resulting gain or loss.
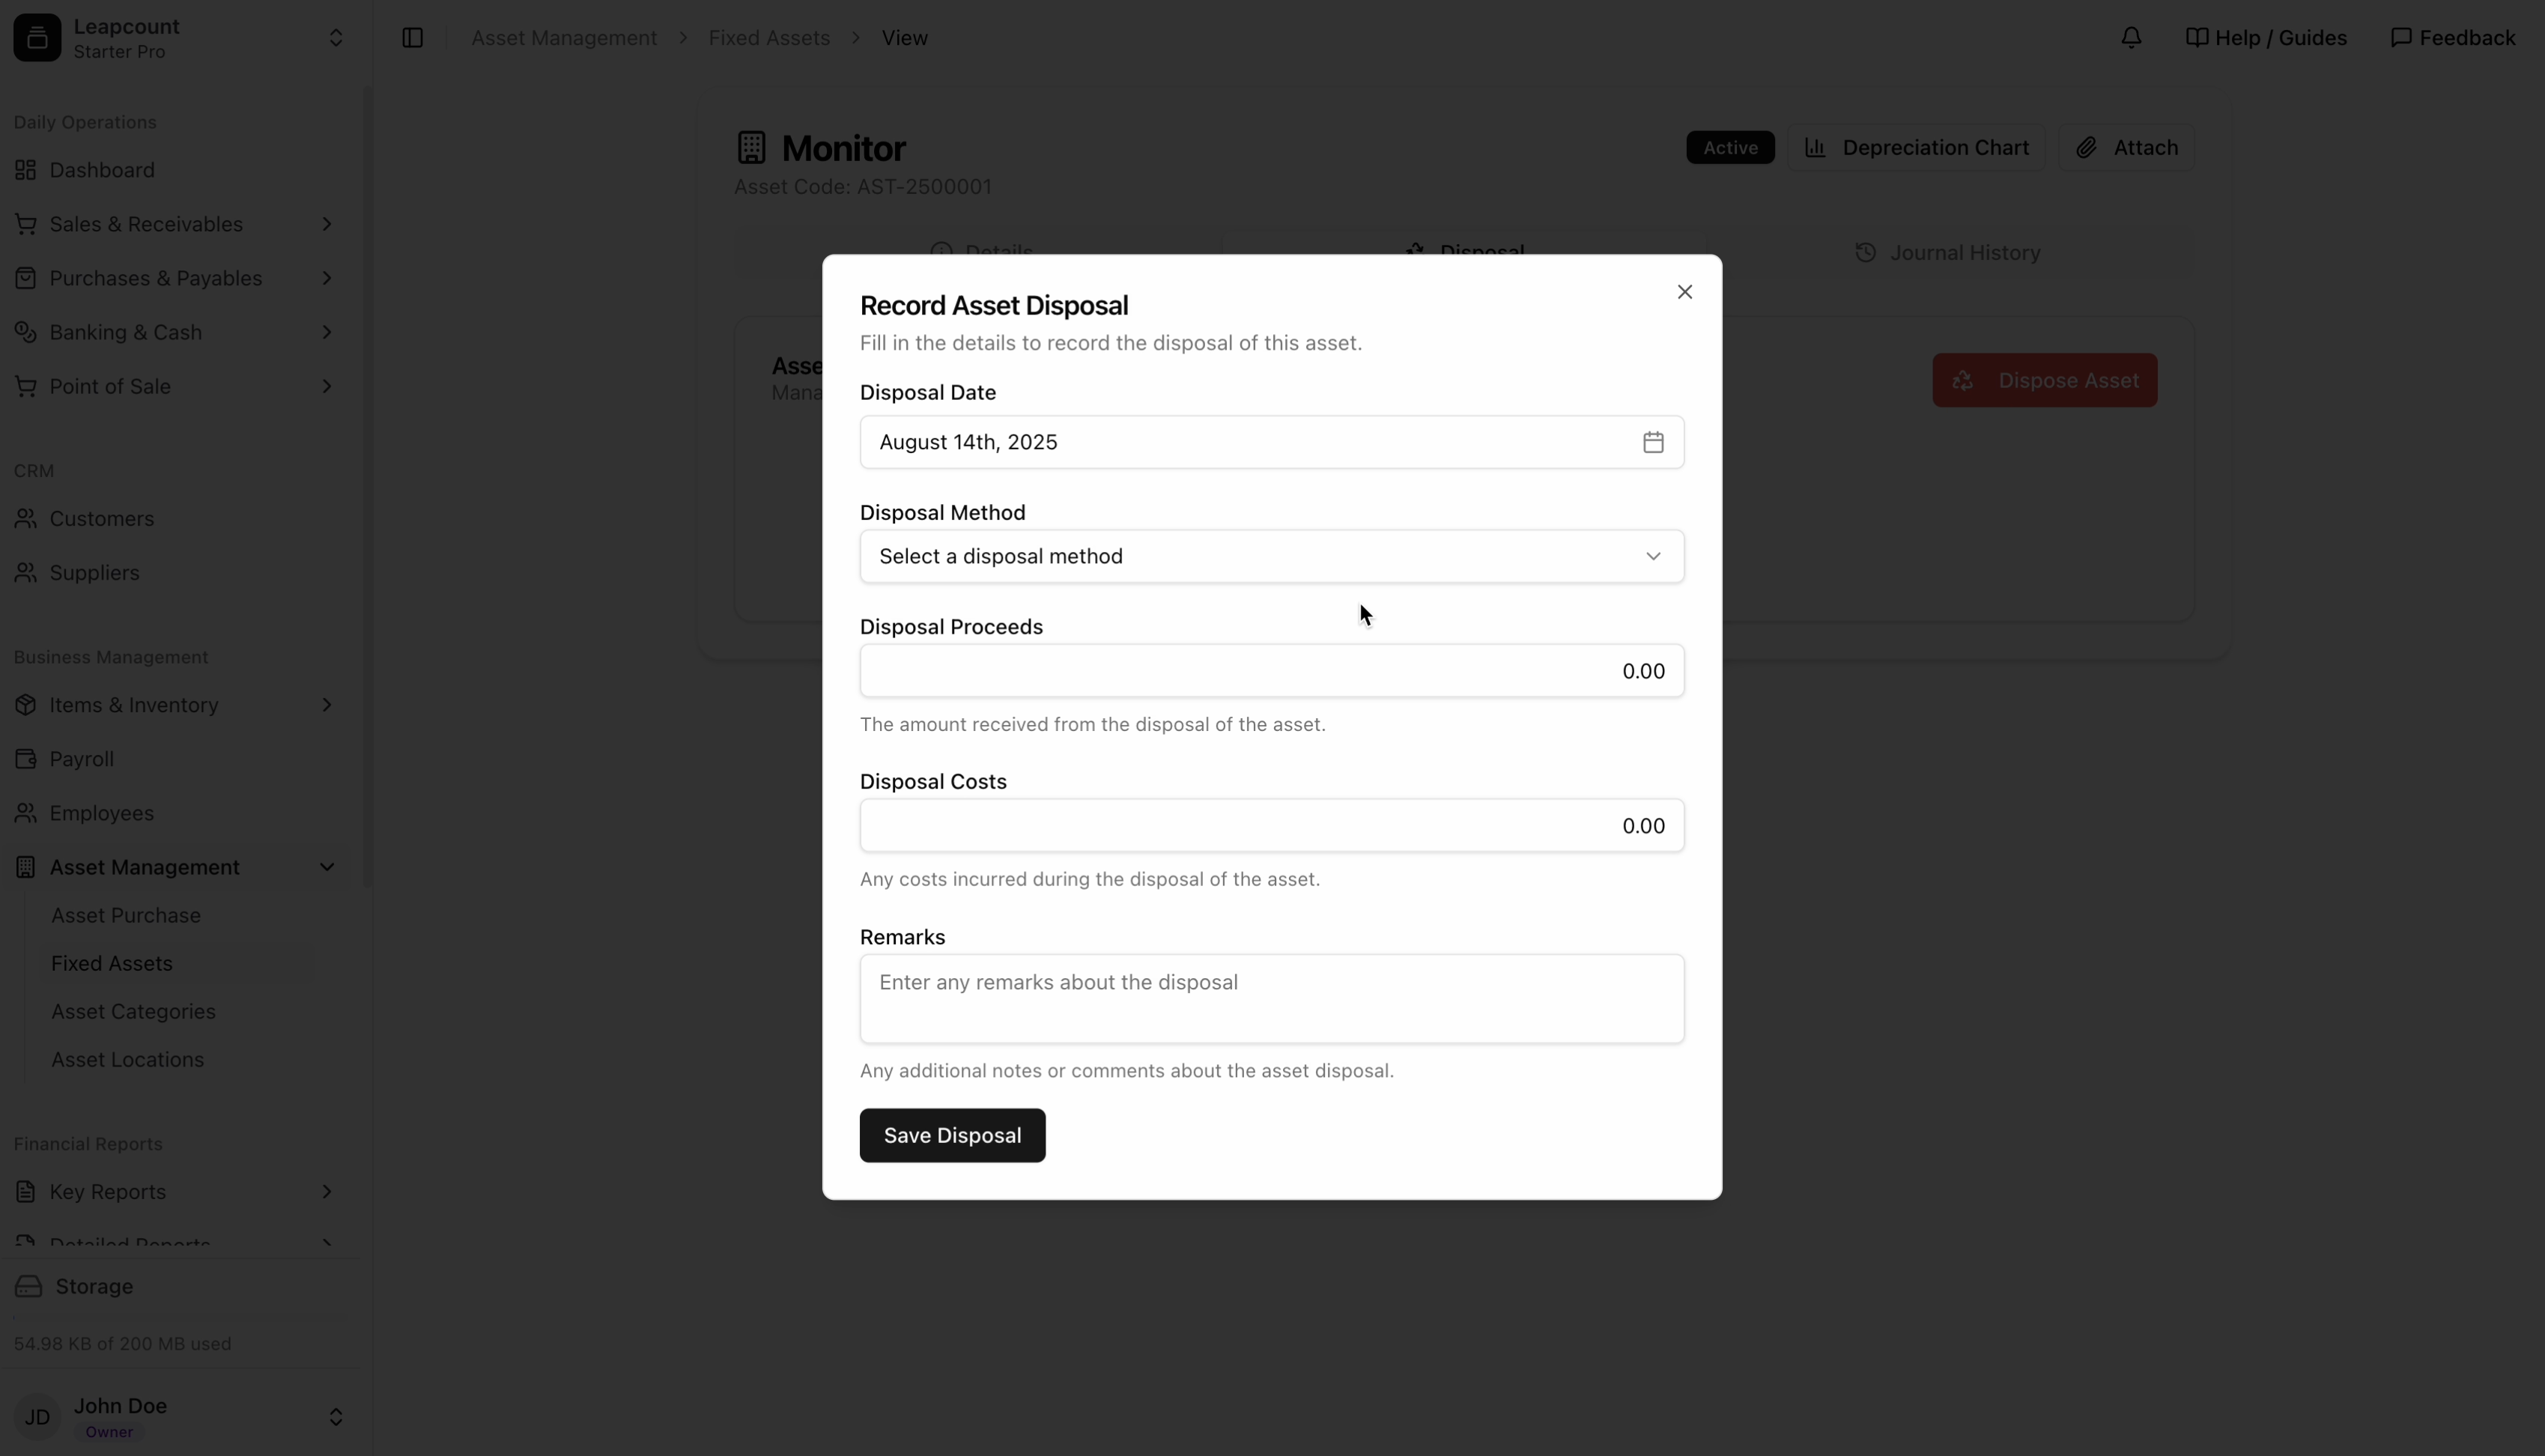
- From the asset's detail page (Figure 4), click the Dispose button.
- Fill in the Record Asset Disposal form with the disposal date, method, any proceeds from the sale, and any costs incurred during disposal.
- Click Save Disposal. This will update the asset's status to "Disposed" and generate the necessary journal entries.
Alternative Method: Direct Asset Entry
Sometimes you need to add an asset to your books without a corresponding purchase document. This is common for assets you already owned before starting to use LeapCount.
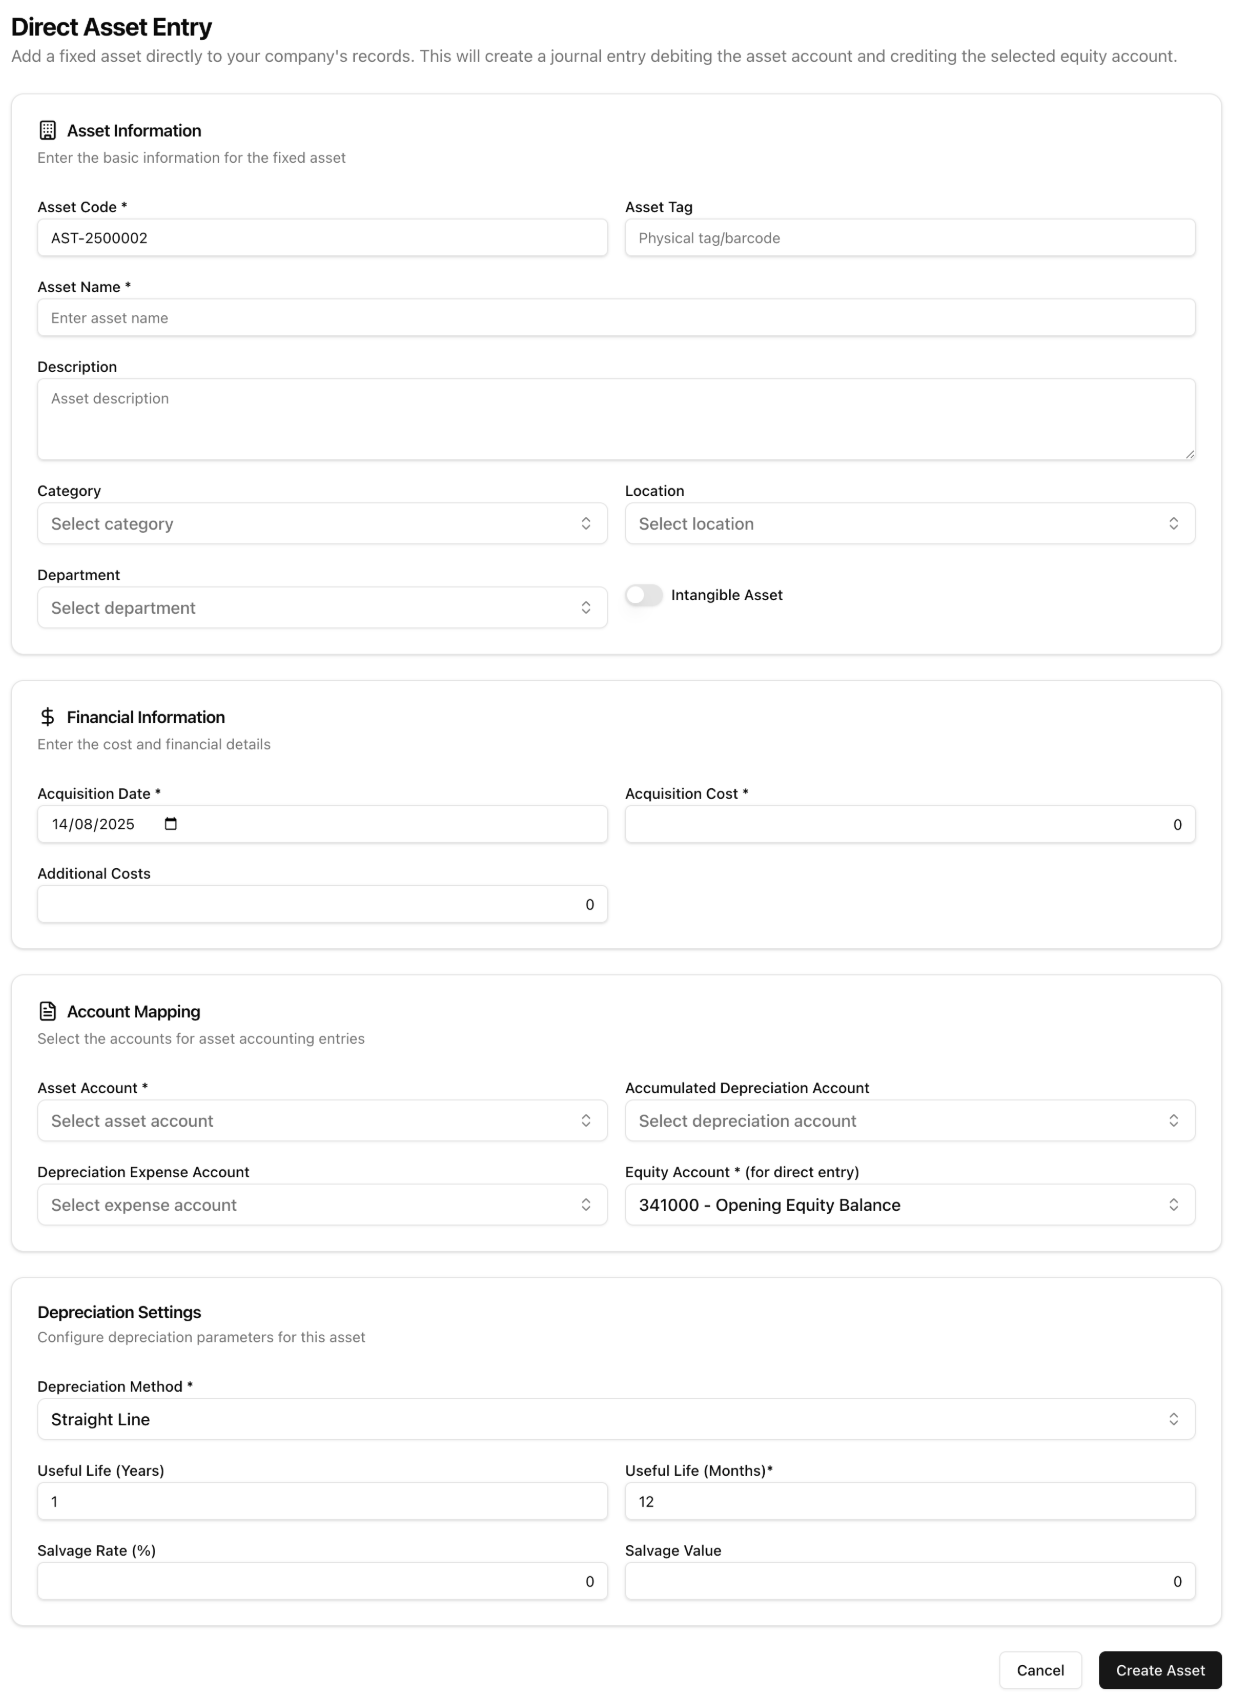
Complete All Details: The Direct Asset Entry form is comprehensive. Ensure you accurately complete the Depreciation Settings section, as this information is mandatory for creating the asset and will be used for all future depreciation calculations.
- Navigate to Asset Management > Fixed Assets.
- Click the + Create Direct Asset button.
- Fill out the comprehensive form, which includes all the sections found on the asset detail page: Asset Information, Financial Information, Account Mapping, and Depreciation Settings.
- Click Create Asset. This method bypasses the Asset Purchase workflow and directly creates the asset in your register.
What's Next?
- Review your Chart of Accounts to ensure your asset and depreciation accounts are set up correctly.
- Run a Balance Sheet Report to see the impact of your asset management on your company's financial position.
- Understand Journal Entries created by asset depreciation and disposal.